FAQ
FAQ by Product
Most Popular
Load More
Latest
only4test must not be used in production for generating new metadata for the setup of SAML authentication.
A new key pair with long-term (e.g. 10 years) validity must be generated and stored into the ${MUSE_HOME}/proxy/webcontexts/ssoRWP/WEB-INF/classes/security/samlKeystore.jks keystore.
Oracle Java keytool or other Certificate Management GUI tools such as CERTivity will have to be involved in this process.
In this article we are describing the process of adding a new key pair in the SAML keystore using the CERTivity tool.
1) Access the tool page from the EduLib website:
https://www.edulib.com/tools/keystores-manager/
download it and obtain a license key by filling in the requested details in the Try form. Install the CERTivity tool by following the installation wizzard.
2) Get from the Muse Proxy server, the ${MUSE_HOME}/proxy/webcontexts/ssoRWP/WEB-INF/classes/security/samlKeystore.jks file, onto the machine where the CERTivity tool is installed.
Open CERTivity, and from the File menu -> Open -> Open KeyStore menu, navigate on the location on disk where the samlKeystore.jks was saved, and load it.
You will be prompted to enter the password, its value is stored in the ${MUSE_HOME}/proxy/webcontexts/ssoRWP/WEB-INF/securityContext-metadata.xml file, in the bean with ID keyManager, the value of the entry node with only4test.
3) Once loaded, click the Generate Key Pair button from the toolbar to open the dialog:
 4) In the Generate Key Pair dialog, fill in the requested fields, making sure the validity period is at least 10 years. Below is an example:
 When saving the new key pair, you will be asked to enter a password.
5) Save the updated keystore by pressing the Save icon from the application’s toolbar.
6) Copy the updated
When saving the new key pair, you will be asked to enter a password.
5) Save the updated keystore by pressing the Save icon from the application’s toolbar.
6) Copy the updated samlKeystore.jks file back on the Muse Proxy server, in the following path on disk:
${MUSE_HOME}/proxy/webcontexts/ssoRWP/WEB-INF/classes/security/
overwriting the existing one.
7) On the Muse Proxy server, edit the ${MUSE_HOME}/proxy/webcontexts/ssoRWP/WEB-INF/securityContext-metadata.xml file, locate the bean with ID keyManager, and add a new entry element in the map node. This is how the new entry should look like:
 (the passwords were removed intentionally for security purposes)
Make sure the file is valid XML after editing.
8) Access the Muse Proxy Administration Console, Configuration -> SAML Authentication and click the Restart SSO button, to restart the SAML servlet to load the updated keystore.
9) When creating new metadata, make sure the newly created key is selected for both Signing key and Encryption key:
(the passwords were removed intentionally for security purposes)
Make sure the file is valid XML after editing.
8) Access the Muse Proxy Administration Console, Configuration -> SAML Authentication and click the Restart SSO button, to restart the SAML servlet to load the updated keystore.
9) When creating new metadata, make sure the newly created key is selected for both Signing key and Encryption key:

The default logger configuration of Muse Proxy is to produce *.log.1, *.log.2…*.log.10 files which rotate by size when reaching 10485760 bytes or at midnight, depending on whichever condition is first met:
Follow the instructions below to have a single log file with an entire day of logging and with the date stamp in the filename, e.g. MuseProxy-20230719:
- Stop the Muse Proxy service
-
Edit the Muse Proxy main configuration file:
${MUSE_HOME}/proxy/MuseProxy.xml
(make a backup copy first of this file)
and replace the existing logger sections (see above), with:
NOTICE
com.edulib.ice.util.log.ICETextLog
${MUSE_HOME}/proxy/logs/MuseProxy.log
0
{0, date,yyyy-MM-dd'T'HH:mm:ss.SSS z} {1}: {4}: {3}
365
0
NOTICE
com.edulib.ice.util.log.ICETextLog
${MUSE_HOME}/proxy/logs/access.log
0
%h %A %w %W "%u" %S %t "%r" "%{Content-Type}o" %s %b %e "%{User-Agent}i" "%{Referer}i" %D
90
0
STATISTICS
com.edulib.ice.util.log.ICETextLog
${MUSE_HOME}/proxy/logs/MuseProxyStatistics.log
0
{0, date,yyyy-MM-dd'T'HH:mm:ss.SSS z} {3}
365
0
Attention must be paid when editing to not break the XML file format. - Start the Muse Proxy service
In production we recommend to use Azure Active Directory with SAML (ADFS). Theoretically there are no special requirements for integration with Azure Active Directory SAML , however this is a multi-step configuration which involves a lot of communication between the Muse Proxy technical team and the customer’s technical team.
The customer must create a new SSO application inside the MS Azure portal for Muse Proxy and provide the metadata URL, which looks like the one below:
https://login.microsoftonline.com/{tennantID}/federationmetadata/2007-06/federationmetadata.xml?appid={appid}
where {tennantID} and {appid} are particular to the customer.
In more detailed steps:
– In the Azure Portal select the Azure Active Directory > Enterprise Application > All applications > New application. Add the custom application by accessing Create your own application link and add the name of the application (e.g. Muse Proxy), making sure the option Integrate any other application you don’t find in the gallery (Non-gallery) is selected. Then chose the application created and select Single sign-on from the Manage menu, and then click the “SAML” button to access the configuration guide.
– In the configuration pages, add at Identifier(Entity ID):
https://proxy.yourdomain.com/MPAppID
where proxy.yourdomain.com is the Muse Proxy domains and MPAppID is the Muse Proxy Application ID for which SSO is being configured.
At the Reply URL (the ACS from metadata) add:
https://proxy.yourdomain.com/ssoRWP/saml/SSO/alias/MPAppID
It is not mandatory to add Sign on URL or Relay State. If Sign on URL is requested, that can be the URL for accessing the MP application:
https://proxy.yourdomain.com/MPAppID
Click the Save button to save the configuration.
– Then, in the SAML Certificates section make sure the Expiration date covers the desired period of time. If using multiple Muse Proxy applications, it is required to upload and use the same certificate for all applications because MS Azure uses the same entity ID with different certificates and this is not according to SAML standards.
– Then go to Configure Muse Proxy (the name the Enterprise application in Azure AD) and from there download the SAML XML Metadata. Note that the link for metadata only works if a certificate was configured in above (paragraph – SAML Signing Certificate Manage the certificate used by Azure AD to sign SAML tokens issued to Muse Proxy.)
Provide to the Muse Proxy technical team the URL with label App Federation Metadata Url from the SAML Certificates section and the downloaded file from label Federation Metadata XML
When done, setup the Muse Proxy application with the SAML authentication, by following the instructions from the Muse Proxy Administrator Console, Configuration left menu item, SAML Authentication.
Note: The above specific Azure instructions are based on our previous experience, the current Azure portal interface may differ.
A requirement for finalizing and testing the ADFS integration is for the customer to provide us a test account (username/password). Make sure the test account is provided access for the newly created Azure application, see the below instructions for doing this:
https://learn.microsoft.com/en-us/azure/active-directory/manage-apps/add-application-portal-assign-users
We strongly recommend to access the Muse Proxy service securely over HTTPS. This is required because almost all content vendor platforms accessed through Muse Proxy rewriting are using the secure protocol, and the same level of security must be matched by Muse Proxy as well. Furthermore, the rewriting of some platforms may not work without https:// access.
For this purpose, a wildcard SSL certificate from a trusted Certificate Authority must be configured in Muse Proxy. By default Muse Proxy comes with a self-signed certificate, the default port for https:// access is 9443. For production systems we recommend using the standard port 443.
Because Muse Proxy is a Java application, the SSL related items, Private key and Certificate must be stored in a Java standard KeyStore file type. In the Java KeyStore format the Certificate and Private Key are grouped in a single Key Pair with a password, and the KeyStore itself is also having a password. For simplicity reasons there should be a single Key Pair in the KeyStore and the Key Pair must have the same password as the KeyStore.
Starting with Muse Proxy version 5.1 Build 02, it is possible to manage the keystores from the Muse Proxy Administrator Console, thus operations like certificate renewal or configuring the certificate for the first time can be done from the console.
In all cases, either it is a renewal or a first time configuration, the steps are mainly the same:
- Create a new keystore;
- Assign the newly created keystore;
- Restart the Muse Proxy service.
Important: Both the certificate as obtained from the CA and private key must be in DER or PEM formats. The private key must be unencrypted.
The steps are detailed below.
1) Create a new keystore
- Access the Muse proxy Administrator Console at URL:
https://{MuseProxyHost}:{MuseProxySSLPort}/admin/
where{MuseProxyHost}is the proxy Host Name and{MuseProxySSLPort}is the value of theSSL_PORTfield from${MUSE_HOME}/proxy/MuseProxy.xmlconfiguration file (default is 9443). If the value of{MuseProxySSLPort}is 443 (default value for HTTPS connections) then this can be omitted from the URL. If it is the first CA signed SSL certificate assignment, you will get a browser security warning about the selfsigned certificate like “Your connection isn’t private”, access the “Continue” link. - Select from the left menu “Server KeyStores” option to expand, then “Available KeyStores“. Click on “Create” button;
- In the new page are available 3 methods for creating a new keystore, the first one is for creating with a selfsigned certificate, this method must be used only for test purposes, not in production. The other two methods are further described, use only one of them , which suits you best.
- KeyStore by Key Pair Import. In the “KeyStore details” section provide the filename with which the keystore will be saved on disk and the password to be set for the keystore.
In the “Certificate” section the certificate and unencrypted private key must be provided, either by pasting their content, PEM format, or by uploading them as files in PEM or DER formats. A sample picture is provided below.

Click the “Import” button when all inputs are filled in with the proper content. Upon success you should get a notification popup like below:

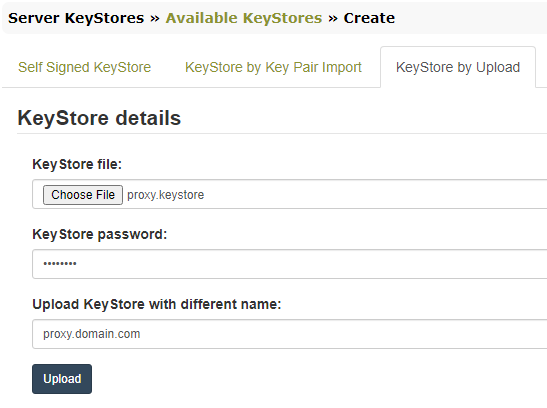
- KeyStore by Upload. This assumes the keystore file is already available, created externally by using the JDK command line tool –
keytoolor through a dedicated certificates handling software like CERTivity® KeyStores Manager.
More details on how to generate the keystore file externally can be found in theMuse Proxy Advanced Configuration.pdfmanual, chapter2.3 SSL KeyStore File.
When uploading it, the keystore password is requested, and the name with which to be saved on disk, if different.
- KeyStore by Key Pair Import. In the “KeyStore details” section provide the filename with which the keystore will be saved on disk and the password to be set for the keystore.
2) Assign the newly created keystore
- Select from the left menu “Server KeyStores” option to expand, then “Assigned KeyStores“;
- In the assigned keystores page, the current keystore in use is displayed:

- Click the “Edit” icon from the “Action” row and in the editing dialog, select the new keystore from the “Available KeyStores” dropdown.
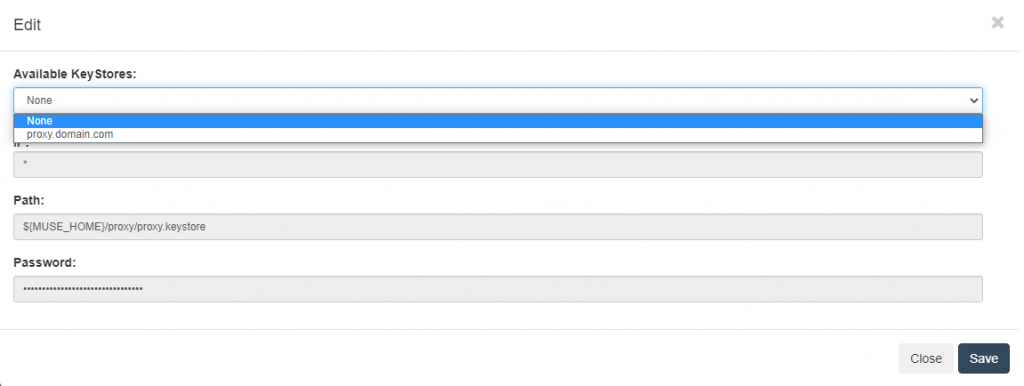
- Click the “Save” button.
3) Restart the Muse Proxy service from the server’s console, e.g. on a Windows based server from the Services Management Console, on a Linux server by issuing a stop command (/etc/init.d/museproxy stop) and a minute late the start command (/etc/init.d/museproxy start).
When done, you can verify the new certificate by accessing in a browser the Muse Proxy service on https://. The browser will issue warnings if the SSL connection is not secure. To view the certificate details, locate and click the padlock next to the URL, the next steps depend on the browser as they are different depending on the browser. You can refer here to an online article for the exact steps to view the SSL certificate details in every well known browser.
We encountered cases on some Windows distributions when the Muse Proxy Windows Service fails to start, usually an error like below can be found in the Windows Event Viewer:
“The LoadLibrary function failed for the following reason: The specified module could not be found.”
The fix consists in adding into the Path system environment variable the path to the Java bin folder. For example, if your Java installation folder is
C:\Program Files\Java\jdk1.8.0_73
then add the following string to the beginning of the value for the Path environment variable:
C:\Program Files\Java\jdk1.8.0_73\bin;
Note that the separator between the entries from the Path variable is the semicolon (;) .
Details for how to update the Path variable for some Windows distributions can be found here:
http://www.java.com/en/download/help/path.xml
After doing this, start the Muse Proxy Service from the Windows Services management console
or by typing in a command prompt window the following command:
net start “Muse Proxy Server”