Muse® Federated Search and Muse Proxy Applications on the Same Server
The Muse™ Federated Search (MuseSearch™) and the Standalone Muse™ Proxy for Muse™ Proxy Applications are two client oriented services powered by Muse™ Technology. Being two separate services it is recommended to run them on separate servers (either physical or virtual machine) to have a clear separation of them from management and technical point of view.
However, there are cases when this setup is not wanted, hence it is required to run them both on the same server (of course only if the hardware characteristics are met). This is the subject of this article.
A Muse™ Proxy component (Software Integration Edition) is already part of Muse™ Federated Search by default for providing IP authentication to data service providers and to rewrite records URLs for end-user link navigation to native records or fulltext.
Technically there are two solutions for hosting the Muse™ Federated Search and a Standalone Muse™ Proxy for Muse™ Proxy Applications services on the same server. These solutions are possible due to the Muse Proxy functionality of binding to multiple IPs.
1. Muse™ Federated Search that includes by default Muse™ Proxy (Software Integration Edition) and a second Standalone Muse™ Proxy with Muse™ Proxy Applications component enabled, which means two Muse™ Proxy instances.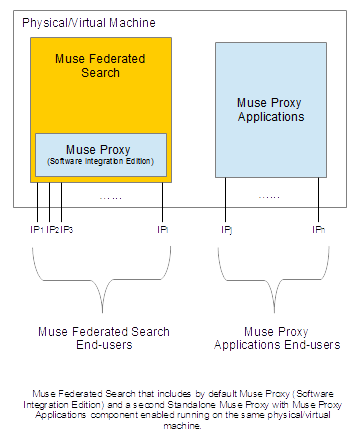
| Advantages | Disadvantages |
|---|---|
|
|
2. Muse™ Federated Search with Muse™ Proxy (Software Integration Edition) but which also enables the Muse™ Proxy Applications component, hence a single Muse™ Proxy instance serving for both, MuseSearch™ clients and for the clients using Muse™ Proxy Applications.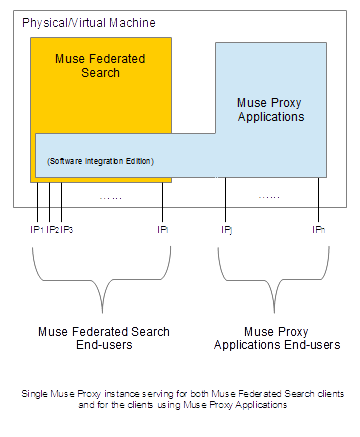
| Advantages | Disadvantages |
|---|---|
|
|
Next are presented the steps for implementing the above 2 solutions.
1. Running two Muse™ Proxy instances on the same server as part of the Muse™ Federated Search and Muse™ Proxy Applications services.
- The first step is to install the Muse™ Federated Search and the Muse™ Proxy needed for it. The installations of Muse™ Federated Search and Muse™ Proxy for Federated Search are not covered in this article. The only note is that the Muse™ Proxy server must be configured to bind to the IPs specific for the Muse™ Federated Search service.
- Make the preparations for installing the Muse™ Proxy Applications service. Because a second Muse™ Proxy service will be installed on the same machine, there are several preparations to be made prior to the installation:
- uninstall the Muse™ Proxy service used by the Muse™ Federated Search service; this is done by running the %MUSE_HOME%\proxy\UnInstallMuseProxyService.bat script on a Windows OS or ${MUSE_HOME}/proxy/setup/startMuseProxyServiceSetup.[sh|csh] on a
Linux OS. - uninstall the Muse™ Proxy service used by the Muse Federated Search service; this is done by running the %MUSE_HOME%\proxy\UnInstallMuseProxyService.bat script on a Windows OS or ${MUSE_HOME}/proxy/setup/startMuseProxyServiceSetup.[sh|csh] on a
Linux OS.- on a Windows OS rename %CommonProgramFiles(x86)%\InstallShield into %CommonProgramFiles(x86)%\InstallShield.MFS and %USERPROFILE%\muse-proxy-options.txt into %USERPROFILE%\muse-proxy-options.txt.MFS;
- on a Linux OS rename ${HOME}/InstallShield into ${HOME}/InstallShield.MFS and ${HOME}/muse-proxy-options.txt into ${HOME}/muse-proxy-options.txt.MFS;
- Install Muse™ Proxy according to the instructions from the Muse™ Proxy Install.pdf manual. During the installation process make sure to install Muse™ Proxy in a different location than the one used by the Muse™ Federated Search service and do not install Muse™ Proxy as a service when asked by the setup. Installing it as a service will be done manually. Do not start the new Muse Proxy instance yet.
- Make the following postinstall configurations:
- edit the MuseProxy.xml file from the newly installed Muse™ Proxy and add in the BINDADDRESS field the list of IPs for the Muse™ Proxy Applications service on which to bind;
- edit the MuseProxy.xml file from the newly installed Muse™ Proxy and add in the RMI_SERVER_ADDRESS field the first IP from the list of IPs for the Muse™ Proxy Applications service;
- edit the startMuseProxy[.|bat|csh] and stopMuseProxy[.|bat|csh] scripts from the newly installed Muse™ Proxy and after the line containing the Copyright statement add the following:
- In the Windows OS scripts (startMuseProxy.bat/stopMuseProxy.bat) add the following line:
set MUSE_HOME=location_on_disk_of_MuseProxywhere replace location_on_disk_of_MuseProxy with the actual location on disk of the newly installed Muse™ Proxy.
- In the Linux OS scripts (startMuseProxy[.csh]/stopMuseProxy[.csh]) add the following line:
export MUSE_HOME=location_on_disk_of_MuseProxywhere replace location_on_disk_of_MuseProxy with the actual location on disk of the newly installed Muse™ Proxy.
- In the Windows OS scripts (startMuseProxy.bat/stopMuseProxy.bat) add the following line:
- On Windows OS edit the InstallMuseProxyService.bat script from the newly installed Muse™ Proxy and change the line::
set SERVICE_NAME=Muse Proxy Serverto
set SERVICE_NAME=Muse Proxy Server Applications
- after the above added line add the following:
set MUSE_HOME=location_on_disk_of_MuseProxywhere replace location_on_disk_of_MuseProxy with the actual location on disk of the newly installed Muse™ Proxy.
- Install the new Muse™ Proxy instance as system service as following:
- On Windows OS run the following script from the newly installed Muse™ Proxy:
InstallMuseProxyService.bat
- On Linux OS copy the existing /etc/init.d/museproxy into /etc/init.d/museproxyapps and:
- edit /etc/init.d/museproxyapps and change the value of the MUSE_HOME variable to point to the location on disk of the newly installed Muse™ Proxy;
- configure the /etc/init.d/museproxyapps script to be started at boot by using system tools such as update-rc.d:
update-rc.d museproxyapps defaults
- Start the Muse™ Proxy Applications service as following:
- On Windows OS go to the “Services” Management Control Console, locate the “Muse™ Proxy Server Applications” service and start it; or start it by running the following command in a Command Prompt window:
net start "Muse Proxy Server Applications" - On Linux OS run the following command:
/etc/init.d/museproxyapps start
- On Windows OS go to the “Services” Management Control Console, locate the “Muse™ Proxy Server Applications” service and start it; or start it by running the following command in a Command Prompt window:
- Update the MUSE_HOME environment variable to point to the Muse™ Federated Search home location (default /opt/muse on Linux and C:\Program Files (x86)\muse on Windows). On Windows go to Control Panel->System->Advanced system settings->Environment variables, locate the definition of the MUSE_HOME variable and change it accordingly. On Linux this is done by editing the user profiles, individually per user in ${HOME}/.login or globally in /etc/profile.
- Install the Muse™ Proxy service for Muse™ Federated Search; this is done by running the
%MUSE_HOME%\proxy\InstallMuseProxyService.batscript on a Windows OS or
${MUSE_HOME}/proxy/setup/startMuseProxyServiceSetup.[sh|csh]on a Linux OS.
- Start the Muse™ Proxy service used by the Muse™ Federated Search as following:
- On Windows OS go to the Services Management Control Console, locate the Muse™ Proxy Server service and start it; or start it by running the following command in a Command Prompt window:
net start "Muse Proxy Server" - On Linux OS run the following command:
/etc/init.d/museproxy start
2. Using the Muse™ Proxy instance from the Muse™ Federated Search service to also serve the Muse™ Proxy Applications service.
The Muse™ Proxy instance from the Muse™ Federated Search service does not have included in the license Muse™ Proxy Applications, hence it must be upgraded to include Muse™ Proxy Applications. For this purpose the latest version of the Muse™ Proxy setup kit must be run with the acquired license that includes Muse™ Proxy Applications. This will be seen as an upgrade, hence the existing configurations of the Muse™ Proxy for the Muse™ Federated Search service will be preserved.