Muse Proxy FAQ
Muse Proxy
AUTHENTICATION_TIMEOUT_ALERT_WINDOW_DURATION field for the Application Web Module from the ${WEB_CONTEXT_HOME}/WEB-INF/web.xml configuration file. By default, this is set to 60 seconds before the Muse Proxy application session will end.
The Muse Proxy Application interface is on top of other core layers, hence increasing the interface timeout value involves increasing the underlying timeouts to avoid the expiration of system sessions before the interface. The underlying timeout values must be bigger than the interface value, or at most equal.
For example, to increase the application inactivity timeout to 60 minutes, the following must be done:
Increase timeout values at the system level
${MUSE_HOME}/proxy/modules/handlers/RequestHandlerWeb.xmlEdit this file on disk and change the value ofCLIENT_SESSION_TIMEOUTto3900000. The default value is:3900000 ${MUSE_HOME}/proxy/webcontexts/NavigationManager/profiles/NavigationSession.xmlEdit this file on disk and change the value ofNAVIGATION_SESSION_TIMEOUTto3600000. The default value is:1800000 3600000 ${MUSE_HOME}/proxy/webcontexts/NavigationManager/profiles/filters/MuseProxyAuthenticationToken.xmlEdit this file on disk and change the value ofAUTHENTICATION_TOKEN_TIMEOUTto7200000. The default value is:3600000 7200000 AUTHENTICATION_TOKEN_TIMEOUTmust be significantly higher than theNAVIGATION_SESSION_TIMEOUT.
Increase the timeout value at the application level
${MUSE_HOME}/proxy/webcontexts/Applications/APPLICATION_ID/WEB-INF/web.xml
This file can be edited in the Muse Proxy Administrator Console, Applications -> Manage Applications, hover the desire proxy application and click the WEB.xml button. Locate the AUTHENTICATION_TIMEOUT field and change its value from the default 1800000 (30 minutes) to 3600000 (60 minutes)
To load the new value immediately, go to the Advanced -> Operations menu and click the Refresh Applications button.
The correct ways to use a proxy URL are listed below:
1) By source ID:
http(s)://YOUR_PROXY_DOMAIN:PORT/APPLICATION_ID?groupID=PLACE_HERE_THE_GROUP_ID&action=source&sourceID=PLACE_HERE_THE_SOURCE_ID
2) By proxy prefix:
http(s)://YOUR_PROXY_DOMAIN:PORT/APPLICATION_ID?qurl=PLACE_HERE_THE_ENCODED_URL_TO_PROXIFY
or
http(s)://YOUR_PROXY_DOMAIN:PORT/APPLICATION_ID?url=PLACE_HERE_THE_URL_TO_PROXIFY
Using a followup rewritten URL which contain session information:
ex: https://0d102vm5x-y-https-search-proquest-com.your_proxy_domain/databases
is not recommended.
You can use the following format:
http(s)://YOUR_PROXY_DOMAIN:PORT/APPLICATION_ID?url=PLACE_HERE_THE_URL_TO_PROXIFY
or
http(s)://YOUR_PROXY_DOMAIN:PORT/APPLICATION_ID?qurl=PLACE_HERE_THE_ENCODED_URL_TO_PROXIFY
where replace YOUR_PROXY_DOMAIN with the actual fully qualified domain name (FQDN) of your Muse Proxy system, PORT with the value of the port on which Muse Proxy runs, and APPLICATION_ID with the correct Muse Proxy application ID.
Example:
https://proxy.yourdomain.org/MuseProxyFoundation?url=https://www.jstor.org/stable/i20716440
or
https://proxy.yourdomain.org/MuseProxyFoundation?qurl=https%3A%2F%2Fwww.jstor.org%2Fstable%2Fi20716440
Important observation:
In order for these proxified links to work, a proper configuration dealing with the rewriting of that domain must be in place in Muse Proxy. Otherwise, if such a configuration does not exist, you will get a message from Muse Proxy like below:
The url parameter provided cannot identify a source. Your organization may not have authentication for that remote target, or a source has not yet been configured to access that remote target.
If you experience this, then further address with the administrator of your Muse Proxy system the need for adding such a configuration (in Muse Proxy terminology it is called a Muse Proxy Source Profile).
The Navigation Sessions are used only by the ‘Navigation Manager’ Web Context (the Muse Navigation Manager component) to store useful data regarding a specific link navigation using a certain target site authentication context (cookies, referrer, next proxy access details, encoding etc.) through Muse Navigation Manager. This type of session is managed using an ID (named MuseSessionID) stored in the path of the Muse Navigation Manager rewritten links. This ID has associated a Navigation Session object at server side that stores the information needed to serve the requests for that Navigation Session (cookies, referrer, authorization, proxy, encoding, etc.).
A Navigation Session is generated by Muse Proxy in the following cases:
– when a user navigates on a ‘Type 1’ rewritten link there is generated automatically a redirect to a ‘Type 2’ rewritten link. The ‘Type 2’ rewritten link generated has associated a new Navigation Session;
– when a user logs into a Muse Proxy application and navigates on a Muse Proxy source link there is generated automatically a redirect to a ‘Type 2’ rewritten link. The ‘Type 2’ rewritten link generated has associated a new Navigation Session.
Many Navigation Sessions can be created for a single client, each corresponding to the authentication context of each rewritten target site. All the Navigation Session objects created for a Muse Proxy client are stored inside the Client Session object associated with that client. There is no limit set for the number of Navigation Sessions associated with each client.
The Client Sessions are used by the Muse Proxy Web Contexts which perform authentication in order to store the client authentication status to that Web Context, as well as other user metadata.
When a request comes to Muse Proxy (as a web server) without a Client Session cookie, a Client Session ID will be generated for it and sent back for storage in the browser in the form of a HTTP cookie. The name of the cookie is ‘MuseClientSessionID’. The Client Session cookie is returned to the Client only for the requests which require an authentication context. If a Client has performed only requests for free or public resources (e.g. static files: *.css, *.js, images etc), no Client Session cookie will be returned in the response.
Muse Proxy Authentication Token authenticates a rewritten request with an authentication token generated by Muse Proxy.
The authentication tokens are generated in the following cases:
A) when a rewritten link is generated using the ‘Utilities >> Rewrite URL’ section from the Muse Proxy Administrator Console and the ‘Muse Proxy Authentication Token’ option is selected. The authentication token generated is included as the ‘MuseProxyAuthenticationToken’ CGI GET parameter in the ‘Type 1’ rewritten link generated;
When ‘Type 1’ rewritten link request is performed, the value of the MuseProxyAuthenticationToken CGI parameter will be extracted and will be stored in the Navigation Session. If the Authentication Token is valid (it is not null or it is not expired) the request will be authenticated.
Otherwise, the entry associated with the user is searched in ${MUSE_HOME}/proxy/hosts.xml file. If the IP of the request is among the list of the ALLOW rules then the JAAS user group used for ‘Type 1’ rewritten links (by default ‘navigationManager’) is checked to match the GROUP entry associated with the user from ${MUSE_HOME}/proxy/hosts.xml file. If the group is matched then the authentication succeeds and the authentication process is finished;
If not, an authentication page will be returned to the client in order for him/her to enter the authentication details for UserName / Password authentication.
B) when a user logs in a Muse Proxy Application and clicks on a Muse Proxy Source link. The authentication token generated is included inside the Navigation Session associated with the ‘Type 2’ rewritten link generated;
When ‘Type 1’ rewritten link request is performed, the Authentication Token value will be extracted directly from the Navigation Session.
For example, when an user navigates on a source link from a Muse Proxy Application, a Navigation Session will be created dynamically in Muse Proxy. In that Navigation Session there is stored an authentication token to be used for the authentication. Next it is returned to the Client a redirect to a ‘Type 2’ rewritten URL which contains the id of the newly created Navigation Session as value for the MuseSessionID parameter from the path part of the URL. When the Client performs a request to this URL the MuseProxyApplicationSources filter extracts all the needed data from the Navigation Session and prepares the request to be handled by Muse Navigation Manager. The request is next authenticated using the authentication token mechanism and after the Muse Navigation Manager filters are applied the response is returned to the user.
C) when a request to 'http://${PROXY_HOST}:${PROXY_PORT}/ProxyInformation' is performed and only if the ‘com.edulib.muse.proxy.filter.MuseProxyAuthenticationToken’ filter is enabled. The value of the authentication token generated is included in the response of the 'http://${PROXY_HOST}:${PROXY_PORT}/ProxyInformation' request in the ‘AUTHENTICATION_TOKEN’ field.
The lifetime of an authentication token depends the value specified in the Authentication Token configuration file, which has the following full path: ${MUSE_HOME}/proxy/webcontexts/NavigationManager/profiles/filters/MuseProxyAuthenticationToken.xml. The Authentication Token configuration file contains only the authentication token timeout value. This value is present in the "AUTHENTICATION_TOKEN_TIMEOUT" field and it represents the timeout value, in milliseconds, after which an authentication token will be dumped.
The overall steps would be:
1) Create the new application as copy of the MuseProxyFoundation template, the ID of the new application to be MuseProxyFoundationHMAC for example.
2) Edit the file
$MUSE_HOME\proxy\webcontexts\Applications\MuseProxyFoundationHMAC\
profiles\AuthenticationGroups.xml
and do the following:
– Locate the
/ICE-CONFIG/AUTHENTICATION_GROUPS/AUTHENTICATION_GROUP/AUTHENTICATIONS
node and remove its content, thus obtaining an empty node:
<AUTHENTICATIONS>

</AUTHENTICATIONS>
– Edit the value of the node
/ICE-CONFIG/AUTHENTICATION_GROUPS/AUTHENTICATION_GROUP/NAME
to be:
HMAC Authentication
– Add the following sequence under the node
/ICE-CONFIG/AUTHENTICATION_GROUPS/AUTHENTICATION_GROUP/AUTHENTICATIONS
<AUTHENTICATION>

<IDENTIFIER>9</IDENTIFIER>

<LEVEL>requisite</LEVEL>

<CLASS>com.edulib.muse.proxy.authentication.modules.ProxyLoginModuleHMAC

</CLASS>

<HANDLER>

<CLASS>com.edulib.muse.proxy.authentication.modules

.ProxyLoginModuleHMACDataHandlerXml</CLASS>

<PARAMETERS>

<CONFIGURATION_FILE>${WEB_CONTEXT_HOME}/profiles/login

/ProxyLoginModuleHMAC.xml</CONFIGURATION_FILE>

</PARAMETERS>

</HANDLER>

</AUTHENTICATION>
(make sure that after pasting the content the XML file is still valid)
3) Refresh the applications properties via the Muse Proxy Administrator Console -> Advanced left menu section -> Operations item -> Refresh Applications button.
Now the HMAC is set with HMAC authentication.
4) Establish and configure the parameters for the HMAC authentication. For this edit the file:
$MUSE_HOME\proxy\webcontexts\Applications\MuseProxyFoundationHMAC
\profiles\login\ProxyLoginModuleHMAC.xml
and make changes according to your requirements. E.g. you may want to change the secret value (default is quiet) and the parameters that you want to hash as part of the signature. By default only the userName (Application ID) and timestamp are used, however you can add the userAgent and/or referer and/or userAddress to be hashed.
We assume for the examples purposes that all defaults remain (e.g. the quiet secret and userName.timestamp as message to sign with HmacSHA1).
Assuming that you want to proxify an URL (ex. http://www.amazon.com/) for the MuseProxyFoundationHMAC Muse Proxy application, the generated HMAC URL will look like:
http://MUSE_PROXY_HOST:PORT/MuseProxyFoundationHMAC?userName=MuseProxyFoundationHMAC

&ts=1469524141&sig=ee5a160dbd37c4867e34e6147a3421d2289bec14

&qurl=http%3A%2F%2Fwww.amazon.com%2F
where MUSE_PROXY_HOST:PORT are the Muse Proxy server details.
Note that by default the validity of this URL is 30 seconds.
For more detailed information on enabling and configuring HMAC authentication refer to the Muse Proxy Advanced Configuration.pdf manual, 6.4.5.8 ProxyLoginModuleHMAC chapter.
5) Create your server side implementation that will generate dynamically the HMAC link(s).
Notes:
1) The generated HMAC URL will work only for 30 seconds (configurable in the value of the TS_EXPIRY field in
$MUSE_HOME\proxy\webcontexts\Applications\MuseProxyFoundationHMAC

\profiles\login\ProxyLoginModuleHMAC.xml)
2) The server generating the HMAC links and the Muse Proxy server must be time synchronized. This is a must, otherwise if the 2 machines are not synchronized with regard to the time, the HMAC links will not work due to the validity value of the signature.
3) If you create proxified links, the destination URL (e.g the value of the qurl parameter) must be URL encoded.
The instructions and code provided below are based on the following assumptions:
– MuseProxyFoundationHMAC is the Muse Proxy application configured with HMAC authentication;
– quiet is the value of the secret;
– userName and timestamp are the signature parameters;
– SHA256 is the algorithm;
– the separator between the signature parameters is . .
Add the following code into your PHP page:
 "MuseProxyFoundation", "ts" => $timestamp, "userAgent" => $userAgent, "referer" => $referer, "userAddress" => $userAddress);

        $used_params = array("userName" => $applicationID, "ts" => $timestamp);
        $museProxy = new MuseProxyHMAC($museProxyURL, $applicationID, $secret, $algorithm, $separator, $used_params);

echo $museProxy->generatedHmacDigest . "
";

        echo "TEST";

?>
where replace MUSE_PROXY_HOST:PORT with your actual Muse Proxy host and port.
The aditional MuseProxyHMAC.php file can be downloaded from here.
The code will generate the HMAC link on the TEST label.
The commented lines are for the cases when you want to use in the signature the userAgent/referer/userAddress values.
Note that they must be specified in the Muse Proxy as well (in the $MUSE_HOME\proxy\webcontexts\Applications\MuseProxyFoundationHMAC
\profiles\login\ProxyLoginModuleHMAC.xml file).
The instructions and code provided below are based on the following assumptions:
– MuseProxyFoundationHMAC is the Muse Proxy application configured with HMAC authentication;
– quiet is the value of the secret;
– userName and timestamp are the signature parameters;
– SHA256 is the algorithm;
– the separator between the signature parameters is . .
Integrate the following code into your Java project:
package com.edulib.muse.proxy.samples;
import java.io.IOException;

import java.io.PrintWriter;

import java.util.LinkedHashMap;
import javax.servlet.ServletException;

import javax.servlet.annotation.WebServlet;

import javax.servlet.http.HttpServlet;

import javax.servlet.http.HttpServletRequest;

import javax.servlet.http.HttpServletResponse;
@WebServlet("/index")

public class Index extends HttpServlet {

private static final long serialVersionUID = 1L;
/**

* Default constructor.

*/

public Index() {

// TODO Auto-generated constructor stub

}
/**

* @see HttpServlet#doGet(HttpServletRequest request, HttpServletResponse response)

*/

protected void doGet(HttpServletRequest request, HttpServletResponse response) throws ServletException, IOException {

response.setContentType("text/html");
String algorithm = "HmacSHA256";

String secret = "quiet";

String proxyURL = "http://MUSE_PROXY_HOST:PORT";

String applicationID = "MuseProxyFoundationHMAC";

String separator = ".";

// timestamp represent the current UNIX timestamp

String timestamp = "" + System.currentTimeMillis() / 1000L;

// referer is the referer from request

String referer = request.getRequestURL().toString();

// userAddres is IP adress for user from request

String userAddress = request.getRemoteAddr();

// userAgent is userAgent from request header

String userAgent = request.getHeader("user-agent");
LinkedHashMap
parameters.put("userName", "test");
parameters.put("ts", timestamp);
parameters.put("referer", referer);
parameters.put("userAddress", userAddress);
parameters.put("userAgent", userAgent);
MuseProxyHMAC museProxyHMAC = new MuseProxyHMAC(proxyURL, applicationID, secret, algorithm, separator, parameters);
PrintWriter out = response.getWriter();

out.print(""<a href=\"" + museProxyHMAC.generatedURL + "\" target=\"_blank\">" + museProxyHMAC.generatedURL + "</a>"");

}

}
where replace MUSE_PROXY_HOST:PORT with your actual Muse Proxy host and port.
The aditional file MuseProxyHMAC.java that needs to be integrated into your Java project can be downloaded from here.
The instructions and code provided below are based on the following assumptions:
- MuseProxyFoundation
HMACis the Muse Proxy application configured withHMACauthentication; - quiet is the value of the secret;
- userName and timestamp are the signature parameters;
- SHA256 is the algorithm;
- the separator between the signature parameters is . .
Integrate the following code into your ASPX page:
<%@ Page Language="C#" %>

<%@ Import Namespace="System" %>

<%@ Import Namespace="System.Linq" %>

<%@ Import Namespace="System.Security.Cryptography" %>

<%@ Import Namespace="System.Text" %>

<%@ Import Namespace="System.IO" %>

<%@ Import Namespace="System.Collections.Generic" %>
<script runat=server>
public String getHmacURL(String museProxyURL, String applicationID, String generatedHmacDigest, String parametersToSend) {
return museProxyURL + "/" + applicationID + "?sig=" + generatedHmacDigest + parametersToSend;
}
public String getParametersToCreateURL(Dictionary
String parametersToSend = "";
foreach( KeyValuePair
{
String key = param.Key;
if (!key.Equals ("userAddress") && !key.Equals ("userAgent") && !key.Equals ("referer")) {
parametersToSend += "&" + key + "=" + param.Value;
}
}
return parametersToSend;
}
public String getValueForGenerateDigest(Dictionary
String value = "";
int length = usedParameters.Count;
for (int i = 0; i < length; i++) {
if (i < length - 1) { value += usedParameters.Values.ElementAt(i) + separator; } else { value += usedParameters.Values.ElementAt(i); } } return value; } public String generateHmacDigest(String algorithm, String secret, String value){ byte[] key = System.Text.ASCIIEncoding.Default.GetBytes(secret); byte[] byteArray = Encoding.ASCII.GetBytes(value); MemoryStream stream = new MemoryStream(byteArray); String digest = null; if (algorithm.Equals ("sha1")) { HMACSHA1 hmacSHA1 = new HMACSHA1 (key); digest = hmacSHA1.ComputeHash (stream).Aggregate ("", (s, e) => s + String.Format ("{0:x2}", e), s => s);
} else if (algorithm.Equals ("md5")) {
HMACMD5 hmacMD5 = new HMACMD5 (key);
digest = hmacMD5.ComputeHash (stream).Aggregate ("", (s, e) => s + String.Format ("{0:x2}", e), s => s);
} else if (algorithm.Equals ("sha256")) {
HMACSHA256 hmacSHA256 = new HMACSHA256 (key);
digest = hmacSHA256.ComputeHash (stream).Aggregate ("", (s, e) => s + String.Format ("{0:x2}", e), s => s);
} else if (algorithm.Equals ("sha384")) {
HMACSHA384 hmacSHA384 = new HMACSHA384 (key);
digest = hmacSHA384.ComputeHash (stream).Aggregate ("", (s, e) => s + String.Format ("{0:x2}", e), s => s);
} else if(algorithm.Equals ("sha512")){
HMACSHA512 hmacSHA512 = new HMACSHA512 (key);
digest = hmacSHA512.ComputeHash (stream).Aggregate ("", (s, e) => s + String.Format ("{0:x2}", e), s => s);
}
return digest;
}
public Dictionary
// timestamp represent the current UNIX timestamp
long ticks = DateTime.UtcNow.Ticks - DateTime.Parse("01/01/1970 00:00:00").Ticks;
ticks /= 10000000; //Convert windows ticks to seconds
String timestamp = ticks.ToString();
// referer is the referer from request
String referer = Request.Url.GetLeftPart(UriPartial.Authority);
// userAddres is IP adress for user from request
String userAddress = GetIP();
// userAgent is userAgent from request header
String userAgent = HttpContext.Current.Request.UserAgent;
Dictionary
parameters.Add ("userName", "username");
parameters.Add ("ts", timestamp);
//parameters.Add("referer", referer);
//parameters.Add("userAddress", userAddress);
//parameters.Add("userAgent", userAgent);
return parameters;
}
String algorithm = "sha256";

String secret = "quiet";

String proxyURL = "http://MUSE_PROXY_HOST:PORT";

String applicationID = "MuseProxyFoundationHMAC";

String separator = ".";
public String getDigest(){
String value = getValueForGenerateDigest(initUsedParameters(), separator);
return generateHmacDigest(algorithm,secret,value);
}
public String getURL(){

return getHmacURL(proxyURL, applicationID, getDigest(), getParametersToCreateURL(initUsedParameters()));

}
public static String GetIP()

{

String ip = HttpContext.Current.Request.ServerVariables["HTTP_X_FORWARDED_FOR"];
if (string.IsNullOrEmpty(ip))
{
ip = HttpContext.Current.Request.ServerVariables["REMOTE_ADDR"];
}
return ip;
}
where replace MUSE_PROXY_HOST:PORT with your actual Muse Proxy host and port.
The aditional file MuseProxyHMAC.cs that needs to be integrated into your project can be dowloaded from here.
The commented lines are for the cases when you want to use in the signature the userAgent/referer/userAddress values.
Note that they must be specified in the Muse Proxy as well (in the $MUSE_HOME\proxy\webcontexts\Applications\MuseProxyFoundationHMAC
\profiles\login\ProxyLoginModuleHMAC.xml file).
Load More
There can be cases when you want that an Application Entry Point takes the end-user directly to the remote source without rewriting. For this a boolean flag is used for redirecting after the last but one request by dropping the proxy prefix and parameters and redirecting to the last URL value (after filling in the existent variables, if any) from the source profile.
The following directive must be added into the source’s XML profile:
[for more details check the Muse Proxy Sources Profiling.pdf manual, chapter 6.22 Redirecting to Remote Source]
Statistics are offered as a service to Muse Proxy customers, no matter they are locally hosted or on cloud. The statistics are generated from content of the Muse Proxy log files:
– access log (access.log).
– statistics log (MuseProxyStatistics.log).
More details about the Muse Proxy log files in the Muse Proxy Advanced Configuration manual, chapter “2.9 Log Files“.
For the instances hosted by MuseGlobal, there is nothing to be done, we take care of everything.
For the locally hosted instances, the main requirement is to upload from your server on a daily basis the 2 log files – access.log and MuseProxyStatistics.log – corresponding to the previous day, onto our FTP repository – ftp.museglobal.com – from where we will further pick them up for processing into the statistics platform.
The log files upload is carried out by means of scripts driven by the system’s scheduler/cron, depending on the Operating System. We provide such scripts.
The main requirement for the upload scripts is to have a single log file per day and with the date stamp in their filenames, e.g. access-yyyyMMdd.log and MuseProxyStatistics-yyyyMMdd.log. Refer to this FAQ for making the required logging changes.
Download the patch containing the necessary scripts from here. Copy the downloaded archive into ${MUSE_HOME} and extract it. The content is deployed into the following location on disk: ${MUSE_HOME}/proxy/tools.
Windows OS
Make sure that the patch is already deployed.
- Edit the
MuseProxyLogsUpload.xmlfile and replace thePLACE_HERE_THE_FTP_USERNAMEandPLACE_HERE_THE_PASSWORDplaceholders with the actual values as provided by the MuseGlobal Support Team. - Open a CMD window, change directory to
%MUSE_HOME%/proxy/tools/and run theMuseProxyLogsUploadAnt.batscript. This is for test purposes to make sure the upload script works. - Create a scheduler job in Windows to run the
%MUSE_HOME%/proxy/tools/MuseProxyLogsUploadAnt.batscript each day after midnight, for example at 1:00 AM. There are many online tutorials for setting up a basic task, like for example here.
Linux OS
Make sure that the patch is already deployed.
- Edit the
MuseProxyLogsUpload.xmlfile and replace thePLACE_HERE_THE_FTP_USERNAMEandPLACE_HERE_THE_PASSWORDplaceholders with the actual values as provided by the MuseGlobal Support Team. - Open a shell session on the server, change directory to
${MUSE_HOME}/proxy/tools/and change the permissions of theMuseProxyLogsUploadAnt.shfile to allow execution. Make the same for the${MUSE_HOME}/proxy/tools/apache-ant-1.10.13/bin/antfile. - Edit the
MuseProxyLogsUploadAnt.shand make sure the value forMUSE_HOMEpoints to the correct location on disk of Muse Proxy. - Run the
MuseProxyLogsUploadAnt.shscript. This is for test purposes to make sure the upload script works. - Create a cron job to run the
${MUSE_HOME}/proxy/tools/MuseProxyLogsUploadAnt.shscript each day after midnight, for example at 1:00 AM.
To make sure Muse Proxy rewrites a website protected by Cloudflare the most reliable way is for the publisher to list the outbound IP address at Cloudflare. This is a must especially if the Cloduflare challenge is set to Interactive Challenge (the captcha-like one).
For publishers not intending to support rewriting proxies, if the publisher site is set up with a non-interactive JS challenge, then the Muse Proxy source profile can be configured using a base64 filter:
Also some Cloudflare cases may require the following profile settings
Many websites implement security mechanisms to protect against spam and abuse from automated computer programs (bots), the most used solutions are the CAPTCHAs.
There are several CAPTCHA implementations available, Google’s reCAPTCHA being very popular.
The reCAPTCHA functionality is based on embedding the Google security check that is incompatible with any rewriting proxy software, which is the man in the middle between the user’s browser and the accessed website, thus considered a potential security issue. Because the domain of the rewriting proxy is different than the publisher domain registered for the reCAPTCHA, the security verification is failing.
However, if the publisher can register the domain of Muse Proxy for reCAPTCHA (ex. proxy.domain.com), the domain security verification will work. From our experience, there are few publishers that support the integration of the proxy domains with reCAPTCHA based on the proxy IP address. Technically they generate a reCAPTCHA key for each proxy domain and use it when the access is made from that proxy IP address.
For some publishers we found that they can disable reCAPTCHA on their site for the Muse Proxy users.
The answer to the question if Muse Proxy supports reCAPTCHA depends on the capabilities of the publisher platform: Yes, if the publisher can offer one of the two solutions described above, and No if there is no coping from the publisher.
Besides Google’s reCAPTCHA, there are other CAPTCHA solutions that can be found on publisher websites. If the publisher can disable the CAPTCHA for the Muse Proxy users, this is the most viable option. If this is not possible, as a last resort, we can try crafting inside the Muse Proxy Source Profile, a set of filters to process the CAPTCHA’s JavaScript coding to pass the domain verification or to redirect to a re-written version of the publisher domain being verified. But this solution takes a lot of development time and may not have a successful outcome and may even be against the terms of service of the publisher/CAPTCHA’s solution.
There are several methods for adding new resources into the Muse Proxy Application for handling the rewriting of vendor platforms, the recommended method is by using the Muse Proxy Administrator Console. The rewriting definitions for a vendor platform are stored in XML files, which we call Muse Proxy Sources.
Mainly the steps for adding a new Muse Proxy Source are:
- Identify the source profile in the existing repository from the EduLib website by accessing this link:
https://www.edulib.com/products/muse-proxy/support/muse-proxy-sources-profiles/
Make use of the search functionality to narrow the results. Any term entered in the search box is searched in the source’s identifier and in the following field values from the source profile:NAMEandDESCRIPTION.
Once identified, click on the name link and a popup window will open with the details of the source’s profile. Click theDownload Profilelink to download the XML file. - Access your Muse Proxy Administrator Console, the URL should be of the form:
https://proxy.domain.com/admin
Login with theadministratoruser and the password that you configured during the setup. - Navigate to the left menu
Aplicationsitem,Manage Applicationslink. Locate the Muse Proxy Application in use and click on theSourcesbutton to access the list of installed sources. - In the
Sourcespage, click on theCreate source from an existing profileicon, next to theQuick Filtersearch box. - In the new page, upload the XML file downloaded at step #1. Upon succesfull upload, you are requested to specify the
Source Identifiervalue, place here the file name without the .xml extension. Also you can change the default name and description values for the source. When done, click theCreatebutton. - The next step is to add the new source profile into a sources group. For doing this, in the
Sourcespage click theEdit Sources Groupsicon, next to theQuick Filtersearch box. In the new page click on theSourcesicon from theActionscolumn, corresponding to the group in which to add the new source. By default only one group exists. - In the new
Sources Groupspage, click on the plus (+) icon found next to the new source in theList of available sourcescolumn. - Test by accessing a proxified link for the newly added resource. E.g.
https://proxy.domain.com/applicationID?url=vendor_URL, where replace the hostname,applicationIDandvendor_URLwith the appropriate values.
The short answer is Yes, Muse Proxy support TLS 1.2.
Muse Proxy runs on Java, hence it uses the Java Virtual Machine security settings, it does not rely on anything from the Operating System in this regard. Also it is not compiled with any specific SSL libraries versions like other software is.
Starting with Java 6 update 115, TLS 1.2 is available, and in Java 7 and 8 it is enabled by default.
Hence Muse Proxy supports TLS 1.2, and to be more precise, TLS 1.2 is supported since 2014 when we added support in the Muse Proxy configuration file to specify the SSL protocols that can be used both on the server end and on the client end (requests
against the sources).
A complete set of manuals on Muse Proxy is available in your installation in the following path - $MUSE_HOME/proxy/doc, where $MUSE_HOME is the location on disk where you installed it:
– Muse Proxy Install.pdf. This is the installation manual.
– Muse Proxy.pdf. This is a manual with general information on Muse Proxy, describing its features.
– Muse Proxy Advanced Configuration.pdf. Manual with technical information on advanced configuration of Muse Proxy.
– Muse Proxy Sources Profiling.pdf. This document describes how to profile a Muse Proxy Source.
– Muse Proxy Administrator Console.pdf. Manual describing the Muse Proxy Administrator Console features.
– Muse Proxy Monitoring and Management using JMX.pdf. Advanced monitoring tools and techniques for monitoring Muse Proxy.
– Muse Proxy Release Notes.pdf. Release notes of Muse Proxy.
Also some general information is further below.
Muse Proxy has a multi-tenant architecture, capable of hosting in the same installation multiple client implementations, each having their own set of resources available and authentication methods.
In Muse Proxy terminology we have Muse Proxy Applications, which are a logical and physical bundle of all items specific for a customer implementation:
– the end user interface (HTML/JS/CSS files). The end-user interface can be easily customized as they are implemented with the Apache FreeMarker templating engine. An end-user interface for a Muse Proxy Application is optional. Each Muse Proxy installation comes by default with two Muse Proxy Applications Templates which you can use as base for creating your customers’ Muse Proxy Applications.
– the resources available;
– the authentication method(s).
By default Muse Proxy comes with a template application, containing a list of sources configured for demo purposes only.
– MKPF.
http://Muse_Proxy_Hostname:Port/MKPF
where replace Muse_Proxy_Hostname with the fully qualified domain name of your Muse Proxy installation and Port with the value of the port on which you installed Muse Proxy (default 9797).
We do not recommend using the template applications in production as they will be overwritten by future Muse Proxy upgrades. New Muse Proxy applications must be created for production by copying the existing template.
You can use MKPF for tests in which you can add new Muse Proxy Sources from the EduLib repository :
https://www.edulib.com/products/muse-proxy/support/muse-proxy-sources/
or you can create new sources profiles by following the profiling rules from the “Muse Proxy Sources Profiling.pdf” manual.
The Muse Proxy Sources are XML files which store all necessary information about a resource, from the URL to access, to rewriting rules for rewriting its content and administrative information such as name, description, etc.
For ProQuest we already have about 80 source profiles for the various databases.
There are several ways of connecting to Muse Proxy:
1) Via the Muse Proxy Application interface. The Muse Proxy Application is a web application which presents to the end-user the collection of subscribed resources under a nice interface with several features like:
– Alphabetical View;
– Grouped view by Subject and/or Type;
– The possibility to have a description for each resource;
– The possibility to have a logo for each resource;
– Pagination options;
– Sorting options.
2) Via “proxified” URLs placed in your website, or constructed dynamically by your discovery/federated search implementation, URLs of the form:
http://Muse_Proxy_Hostname:Port/ApplicationID?url=Publisher_URL
where Muse_Proxy_Hostname is the hostname of your Muse Proxy instance; Port is the port on which it runs (default 9797); ApplicationID is the ID of the Muse Proxy Application; Publisher_URL is the URL to the publisher platform.
For example:
http://proxy.domain.com/myApplication?url=http://search.proquest.com/
When accessing such URL, if not already authenticated, Muse Proxy will authenticate the end-user through the configured authentication method, and upon authentication will present the end-user the publisher website in a rewritten form.
The Muse Proxy Application UI is based on skins.
If you want to customize the look and feel for a Muse Proxy Application we recommend the following approach:
– copy the existing skin with a different name. The skins folder is located on disk in the following location:
%MUSE_HOME%\proxy\webcontexts\Applications\

APPLICATION_ID\www\static\skins
where replace the APPLICATION_ID with the actual ID of the Muse Proxy Application.
– make the desired changes in the new skin;
– configure the Muse Proxy Application to use the new skin. This is done by editing the file:
%MUSE_HOME%\proxy\webcontexts\Applications\

APPLICATION_ID\www\application.inc
and changing the value of the variable applicationSkinId with the name of the new skin;
In the Muse Proxy.pdf manual, chapter Customize Muse Proxy Application Interface you can find information for how to customize the Muse Proxy Application UI.
The version of muse proxy can be found via putting in the following URL in an address bar on a browser such as FireFox or Internet Explorer:
http://PROXY_HOST:PROXY_PORT/ProxyInformation
In the above URL, PROXY_HOST is the server that is hosting Muse Proxy. PROXY PORT is the port that is running proxy. The default port for Muse Proxy is 9797.
The response is a XML message which is rendered raw by the browser. To correctly see the proxy version, view the source of the page (this is done differently in each browser) and search for the value of the
Please note that a dialog box may pop-up for entering UN/PW unless the IP where the request is coming from is allowed under the default section of the hosts.xml file under $MUSE_HOME/proxy/hosts.xml .
The Flash and Java Applets resources are binary files which cannot be processed by any re-writing proxy, including Muse Proxy.
Flash and Java Applets may load in pages re-written by Muse Proxy as long as there are no absolute pathnames in URLs inside them or if there is an object parameter of the Flash or Java Applet, accepting its base URL. However, if the Flash or Java Applet contains links inside them, they will not be re-written.
In other words the Flash and Java Applets may display correctly in Muse Proxy re-written pages, but when an end-user clicks a link hidden inside the Flash or Java Applets it is possible it will go straight to the provider and may appear unauthorized.
In Muse, there are 2 types of proxy chaining:
a) “ProxyChaining” happens when the MNM chains with the proxy used for source authentication. In a Muse application where we have configured a MNM_HOST to re-write the record links and a PROXY_HOST to use for authentication we have the following scenarios:
1) If the MNM and PROXY fields have different values then at runtime when the end user navigates on a rewritten link the following happens:
– enduser makes HTTP request to MNM_HOST
– the MNM_HOST makes the HTTP request to PROXY_HOST, thus chaining.
– the PROXY_HOST makes the HTTP request to the native data source.
This scenario is described in the Muse Advanced Configuration.pdf document, chapter “Data Services IP Authentication” and applies in all ASP Muse environments where IP authentications are used. For example, this type of proxy chaining is used in all our hosted Muse instances.
2) If the MNM is the same as the PROXY_HOST then the proxy chaining does not occur anymore.
Note that the proxy chaining feature works only if the com.edulib.muse.proxy.filter.ProxyChain filter is enabled in the $MUSE_HOME/proxy/MuseProxy.xml configuration file.
Also note that the proxy chaining feature works with other proxies than Muse Proxy used for source authentication, e,g, when PROXY_HOST is other proxy than Muse Proxy .
b) Another type of proxy chaining is when the Muse Proxy is configured to use another proxy, meaning that it will forward all HTTP requests to the configured proxy. This happens when the following fields from the "$MUSE_HOME/proxy/MuseProxy.xml" file are configured:
Type a) of proxy chaining is the most encountered in the Muse installations.
They are types of rewritten links handled by the ‘Navigation Manager’ web context.
A) Example of ‘Type 1’ rewritten URL:
http://navigationManagerHost:navigationManagerPort/com/site/?MuseProtocol=ProtocolValue&MuseHost=some.site.com
&targetSiteParameter1=targetSiteParameterValue1

...

&targetSiteParameterN=targetSiteParameterValueN

&MuseCookie=CookieValue&MuseReferer=RefererValue

&MuseAuthorization=AuthorizationValue

&MuseAuthorizationScheme=AuthorizationSchemeValue

&MuseProxyHost=ProxyHostValue&MuseProxyPort=ProxyPortValue

&MuseProxyPac=ProxyPacValue

&MuseProxyAuthorization=ProxyAuthorizationValue

&MuseProxyAuthorizationScheme=ProxyAuthorizationSchemeValue

&MuseCharset=CharsetValue&MuseUID=UIDValue

&MuseProxyAuthenticationToken=ProxyAuthenticationTokenValue

&MuseNavigationManagerMode=NavigationManagerModeValue&MusePath=PathValue
A rewritten link is of ‘Type 1’ format if it contains the Muse Navigation Manager authentication markers (MuseCookie, MuseReferer, MuseProxyHost etc. as CGI parameters) and if it does not contain the MuseSessionID marker in the path part of the URL.
The ‘Type 1’ URL can be manually created, automatically generated from a different application or can be generated using the “Utilities >> Rewrite URL” section from the Muse Proxy Administrator console. The latter is available only if the “Enable Type 1 Links” option is enabled in the Muse Proxy License Key File.
B) The ‘Type 2’ rewritten URLs are dynamical URLs associated with a navigation session managed by Muse Proxy. The ‘Type 2’ rewritten URLs are valid only for small periods of time (by default 30 minutes after they are last accessed), while the navigation session associated with them is still valid.
Example of ‘Type 2’ rewritten URL:
http://navigationManagerHost:navigationManagerPort/MuseSessionID=SessionIDValue

/MuseProtocol=ProtocolValue/MuseHost=some.site.com/MusePath

/targetSitePathPart1/.../targetSitePathPartN/?

&targetSiteParameter1=targetSiteParameterValue1

...

&targetSiteParameterN=targetSiteParameterValueN
A rewritten link is of ‘Type 2’ format if it contains the MuseSessionID marker in the path part of the URL.
The ‘Type 2’ rewritten links cannot be manually generated. They are generated by Muse Proxy in the following cases:
– when a user navigates on a ‘Type 1’ rewritten link there is generated automatically a redirect to a ‘Type 2’ rewritten link;
– when a user logs into a Muse Proxy application and navigates on a Muse Proxy source link there is generated automatically a redirect to a ‘Type 2’ rewritten link;
– all the rewritten links inside a rewritten page are rewritten links of ‘Type 2’.
For authenticating the end-users into a Muse Proxy Application the following authentication modules are available:
–ProxyLoginModuleUserPassword. Performs User Name/Password authentication.
–ProxyLoginModuleIP. Performs IP authentication based on client machine IP.
–ProxyLoginModuleLDAP. Performs authentication against a LDAP Server.
–ProxyLoginModuleFTP. Performs authentication against a FTP Server. The FTP authentication module supports NONE, SSL or TLS connection encryptions.
– ProxyLoginModuleIMAP. Performs authentication against a IMAP Server. The IMAP authentication module supports NONE, SSL or TLS connection encryptions.
–ProxyLoginModuleSQL. Performs authentication against an SQL Server through Java Database Connectivity (JDBC). The SQL authentication module supports NONE, SSL or TLS connection encryptions.
–ProxyLoginModuleReferer.Performs authentication against the client’s referer URL.
You can read more about the authentication in a Muse Proxy Application in the “Muse Proxy.pdf” manual, chapter “Authentication of a Muse Proxy Application”.
This may be due to the default Windows limitations for network connections, more exactly the max limit set on simultaneous network connections. Receiving the TCP/IP has reached the security limit imposed on the number of concurrent TCP connect attempts error in Windows Event Viewer for Event ID 4226 is a clear sign of reaching the limit set on simultaneous network connections.
To disable the TCP connections limit follow the steps:
1) Click Start, type regedit in the Start Search box, and then click regedit.exe in the Programs list. If you are prompted for an administrator password or for confirmation, type your password, or click Continue.
2) Locate and then double-click the following registry key:
HKEY_LOCAL_MACHINE\SYSTEM\CurrentControlSet\Services\Tcpip\Parameters\EnableConnectionRateLimiting
3) In the Value data box, type 0, and then click OK.
4) Exit Registry Editor.
5) Restart the computer.
If the EnableConnectionRateLimiting registry entry does not exist it must be added.
The Microsoft Knowledge Base article KB969710 confirms that the half-open TCP connections limit is disabled in Windows Server 2008 with Service Pack 2 (SP2) and in Windows Vista with Service Pack 2 (SP2).
The PERSISTENT-URL (sometimes also called durable URLs or durable links) is a url to a detailed native record and it is specifically not rewritten by Muse Navigation Manager. The PERSISTENT-URL link was created as an URL for which the users will use their own authentication to access the native data. The PERSISTENT-URL was specifically designed to not be tied to a search session and to provide a persistent link outside of Muse applications. They are not intended to take the place of a normal URL link in Muse records.
It is normal to be prompted to enter access details after following the PERSISTENT-URL to get to the record page. If the end-user is IP-authenticated to an account containing the required database, then the record page will appear without entering additional credentials.
In conclusion:
– use the regular DATA/URL to access the native data directly without having to enter user/password details
– use the DATA/PERSISTENT-URL when you want to provide your users an URL for which they should use their individual access details and only after that they will be able to go to that native record.
This FAQ has been created for partners to check the Muse Proxy configuration ($MUSE_HOME/proxy/hosts.xml file) to make sure they are not open proxies, and therefore prone to illegal usage.
RULES TO MODIFY:
1.) In the hosts.xml under the default user, there should be no
The default user allows the ICE Servers to access Muse Proxy. If the
2.) In the hosts.xml under the administrator user, there should be no
Like the default user above, if the
RULES TO KEEP IN PLACE:
1.) For Muse Proxies above the 2.2.2.0 version, there is the following rule for the default.mnm user:
This must be kept in place, so that end users will able to navigate to links rewritten via Muse Navigation Manager.
2.)Under the
This must be kept in place. The REMOTE_PORTS section specifies the outgoing access port rules of the Muse proxy, i.e. to what remote ports the Muse Proxy is allowed to connect to. By default, we block access to the following remote ports:
20,21: File Transfer Protocol (FTP)
22: Secure Shell (SSH)
23: Telnet
25: Simple Mail Transfer Protocol (SMTP)
and allow access to the rest of the ports. Meaning that the Muse Proxy can connect to data services on any other ports except the ones listed above.
The
3.) It is also recommended that if an
Load More
The out-of-the-box signing and encryption key named only4test must not be used in production for generating new metadata for the setup of SAML authentication.
A new key pair with long-term (e.g. 10 years) validity must be generated and stored into the ${MUSE_HOME}/proxy/webcontexts/ssoRWP/WEB-INF/classes/security/samlKeystore.jks keystore.
Oracle Java keytool or other Certificate Management GUI tools such as CERTivity will have to be involved in this process.
In this article we are describing the process of adding a new key pair in the SAML keystore using the CERTivity tool.
1) Access the tool page from the EduLib website:
https://www.edulib.com/tools/keystores-manager/
download it and obtain a license key by filling in the requested details in the Try form. Install the CERTivity tool by following the installation wizzard.
2) Get from the Muse Proxy server, the ${MUSE_HOME}/proxy/webcontexts/ssoRWP/WEB-INF/classes/security/samlKeystore.jks file, onto the machine where the CERTivity tool is installed.
Open CERTivity, and from the File menu -> Open -> Open KeyStore menu, navigate on the location on disk where the samlKeystore.jks was saved, and load it.
You will be prompted to enter the password, its value is stored in the ${MUSE_HOME}/proxy/webcontexts/ssoRWP/WEB-INF/securityContext-metadata.xml file, in the bean with ID keyManager, the value of the entry node with only4test.
3) Once loaded, click the Generate Key Pair button from the toolbar to open the dialog:

4) In the Generate Key Pair dialog, fill in the requested fields, making sure the validity period is at least 10 years. Below is an example:

When saving the new key pair, you will be asked to enter a password.
5) Save the updated keystore by pressing the Save icon from the application’s toolbar.
6) Copy the updated samlKeystore.jks file back on the Muse Proxy server, in the following path on disk:
${MUSE_HOME}/proxy/webcontexts/ssoRWP/WEB-INF/classes/security/
overwriting the existing one.
7) On the Muse Proxy server, edit the ${MUSE_HOME}/proxy/webcontexts/ssoRWP/WEB-INF/securityContext-metadata.xml file, locate the bean with ID keyManager, and add a new entry element in the map node. This is how the new entry should look like:

(the passwords were removed intentionally for security purposes)
Make sure the file is valid XML after editing.
8) Access the Muse Proxy Administration Console, Configuration -> SAML Authentication and click the Restart SSO button, to restart the SAML servlet to load the updated keystore.
9) When creating new metadata, make sure the newly created key is selected for both Signing key and Encryption key:

The default logger configuration of Muse Proxy is to produce *.log.1, *.log.2…*.log.10 files which rotate by size when reaching 10485760 bytes or at midnight, depending on whichever condition is first met:
Follow the instructions below to have a single log file with an entire day of logging and with the date stamp in the filename, e.g. MuseProxy-20230719:
- Stop the Muse Proxy service
-
Edit the Muse Proxy main configuration file:
${MUSE_HOME}/proxy/MuseProxy.xml
(make a backup copy first of this file)
and replace the existing logger sections (see above), with:
NOTICE
com.edulib.ice.util.log.ICETextLog
${MUSE_HOME}/proxy/logs/MuseProxy.log
0
{0, date,yyyy-MM-dd'T'HH:mm:ss.SSS z} {1}: {4}: {3}
365
0
NOTICE
com.edulib.ice.util.log.ICETextLog
${MUSE_HOME}/proxy/logs/access.log
0
%h %A %w %W "%u" %S %t "%r" "%{Content-Type}o" %s %b %e "%{User-Agent}i" "%{Referer}i" %D
90
0
STATISTICS
com.edulib.ice.util.log.ICETextLog
${MUSE_HOME}/proxy/logs/MuseProxyStatistics.log
0
{0, date,yyyy-MM-dd'T'HH:mm:ss.SSS z} {3}
365
0
Attention must be paid when editing to not break the XML file format. - Start the Muse Proxy service
In production we recommend to use Azure Active Directory with SAML (ADFS). Theoretically there are no special requirements for integration with Azure Active Directory SAML , however this is a multi-step configuration which involves a lot of communication between the Muse Proxy technical team and the customer’s technical team.
The customer must create a new SSO application inside the MS Azure portal for Muse Proxy and provide the metadata URL, which looks like the one below:
https://login.microsoftonline.com/{tennantID}/federationmetadata/2007-06/federationmetadata.xml?appid={appid}
where {tennantID} and {appid} are particular to the customer.
In more detailed steps:
– In the Azure Portal select the Azure Active Directory > Enterprise Application > All applications > New application. Add the custom application by accessing Create your own application link and add the name of the application (e.g. Muse Proxy), making sure the option Integrate any other application you don’t find in the gallery (Non-gallery) is selected. Then chose the application created and select Single sign-on from the Manage menu, and then click the “SAML” button to access the configuration guide.
– In the configuration pages, add at Identifier(Entity ID):
https://proxy.yourdomain.com/MPAppID
where proxy.yourdomain.com is the Muse Proxy domains and MPAppID is the Muse Proxy Application ID for which SSO is being configured.
At the Reply URL (the ACS from metadata) add:
https://proxy.yourdomain.com/ssoRWP/saml/SSO/alias/MPAppID
It is not mandatory to add Sign on URL or Relay State. If Sign on URL is requested, that can be the URL for accessing the MP application:
https://proxy.yourdomain.com/MPAppID
Click the Save button to save the configuration.
– Then, in the SAML Certificates section make sure the Expiration date covers the desired period of time. If using multiple Muse Proxy applications, it is required to upload and use the same certificate for all applications because MS Azure uses the same entity ID with different certificates and this is not according to SAML standards.
– Then go to Configure Muse Proxy (the name the Enterprise application in Azure AD) and from there download the SAML XML Metadata. Note that the link for metadata only works if a certificate was configured in above (paragraph – SAML Signing Certificate Manage the certificate used by Azure AD to sign SAML tokens issued to Muse Proxy.)
Provide to the Muse Proxy technical team the URL with label App Federation Metadata Url from the SAML Certificates section and the downloaded file from label Federation Metadata XML
When done, setup the Muse Proxy application with the SAML authentication, by following the instructions from the Muse Proxy Administrator Console, Configuration left menu item, SAML Authentication.
Note: The above specific Azure instructions are based on our previous experience, the current Azure portal interface may differ.
A requirement for finalizing and testing the ADFS integration is for the customer to provide us a test account (username/password). Make sure the test account is provided access for the newly created Azure application, see the below instructions for doing this:
https://learn.microsoft.com/en-us/azure/active-directory/manage-apps/add-application-portal-assign-users
We strongly recommend to access the Muse Proxy service securely over HTTPS. This is required because almost all content vendor platforms accessed through Muse Proxy rewriting are using the secure protocol, and the same level of security must be matched by Muse Proxy as well. Furthermore, the rewriting of some platforms may not work without https:// access.
For this purpose, a wildcard SSL certificate from a trusted Certificate Authority must be configured in Muse Proxy. By default Muse Proxy comes with a self-signed certificate, the default port for https:// access is 9443. For production systems we recommend using the standard port 443.
Because Muse Proxy is a Java application, the SSL related items, Private key and Certificate must be stored in a Java standard KeyStore file type. In the Java KeyStore format the Certificate and Private Key are grouped in a single Key Pair with a password, and the KeyStore itself is also having a password. For simplicity reasons there should be a single Key Pair in the KeyStore and the Key Pair must have the same password as the KeyStore.
Starting with Muse Proxy version 5.1 Build 02, it is possible to manage the keystores from the Muse Proxy Administrator Console, thus operations like certificate renewal or configuring the certificate for the first time can be done from the console.
In all cases, either it is a renewal or a first time configuration, the steps are mainly the same:
- Create a new keystore;
- Assign the newly created keystore;
- Restart the Muse Proxy service.
Important: Both the certificate as obtained from the CA and private key must be in DER or PEM formats. The private key must be unencrypted.
The steps are detailed below.
1) Create a new keystore
- Access the Muse proxy Administrator Console at URL:
https://{MuseProxyHost}:{MuseProxySSLPort}/admin/
where{MuseProxyHost}is the proxy Host Name and{MuseProxySSLPort}is the value of theSSL_PORTfield from${MUSE_HOME}/proxy/MuseProxy.xmlconfiguration file (default is 9443). If the value of{MuseProxySSLPort}is 443 (default value for HTTPS connections) then this can be omitted from the URL. If it is the first CA signed SSL certificate assignment, you will get a browser security warning about the selfsigned certificate like “Your connection isn’t private”, access the “Continue” link. - Select from the left menu “Server KeyStores” option to expand, then “Available KeyStores“. Click on “Create” button;
- In the new page are available 3 methods for creating a new keystore, the first one is for creating with a selfsigned certificate, this method must be used only for test purposes, not in production. The other two methods are further described, use only one of them , which suits you best.
- KeyStore by Key Pair Import. In the “KeyStore details” section provide the filename with which the keystore will be saved on disk and the password to be set for the keystore.
In the “Certificate” section the certificate and unencrypted private key must be provided, either by pasting their content, PEM format, or by uploading them as files in PEM or DER formats. A sample picture is provided below.

Click the “Import” button when all inputs are filled in with the proper content. Upon success you should get a notification popup like below:

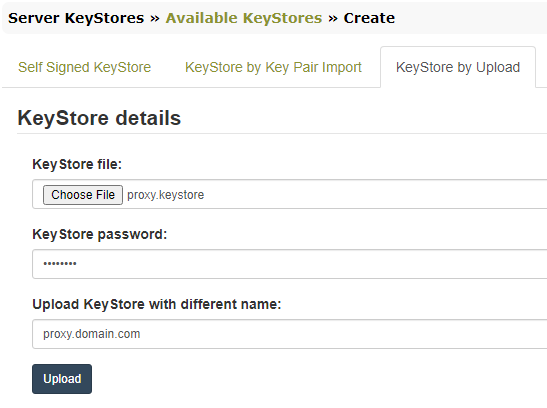
- KeyStore by Upload. This assumes the keystore file is already available, created externally by using the JDK command line tool –
keytoolor through a dedicated certificates handling software like CERTivity® KeyStores Manager.
More details on how to generate the keystore file externally can be found in theMuse Proxy Advanced Configuration.pdfmanual, chapter2.3 SSL KeyStore File.
When uploading it, the keystore password is requested, and the name with which to be saved on disk, if different.
- KeyStore by Key Pair Import. In the “KeyStore details” section provide the filename with which the keystore will be saved on disk and the password to be set for the keystore.
2) Assign the newly created keystore
- Select from the left menu “Server KeyStores” option to expand, then “Assigned KeyStores“;
- In the assigned keystores page, the current keystore in use is displayed:

- Click the “Edit” icon from the “Action” row and in the editing dialog, select the new keystore from the “Available KeyStores” dropdown.
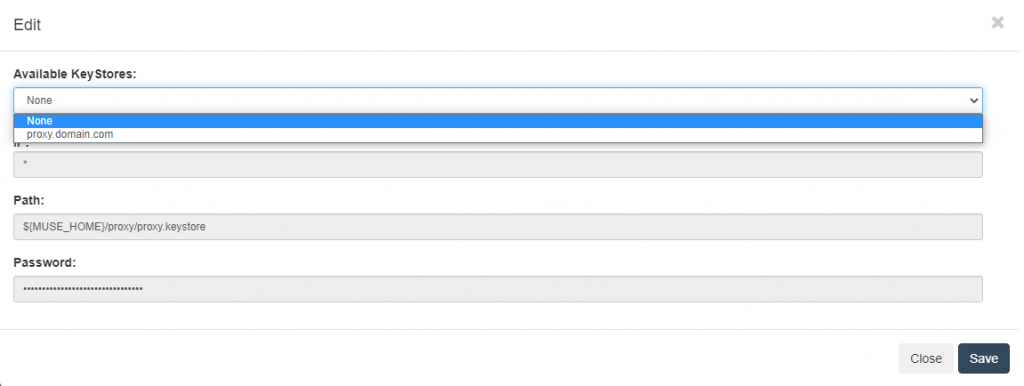
- Click the “Save” button.
3) Restart the Muse Proxy service from the server’s console, e.g. on a Windows based server from the Services Management Console, on a Linux server by issuing a stop command (/etc/init.d/museproxy stop) and a minute late the start command (/etc/init.d/museproxy start).
When done, you can verify the new certificate by accessing in a browser the Muse Proxy service on https://. The browser will issue warnings if the SSL connection is not secure. To view the certificate details, locate and click the padlock next to the URL, the next steps depend on the browser as they are different depending on the browser. You can refer here to an online article for the exact steps to view the SSL certificate details in every well known browser.
We encountered cases on some Windows distributions when the Muse Proxy Windows Service fails to start, usually an error like below can be found in the Windows Event Viewer:
“The LoadLibrary function failed for the following reason: The specified module could not be found.”
The fix consists in adding into the Path system environment variable the path to the Java bin folder. For example, if your Java installation folder is
C:\Program Files\Java\jdk1.8.0_73
then add the following string to the beginning of the value for the Path environment variable:
C:\Program Files\Java\jdk1.8.0_73\bin;
Note that the separator between the entries from the Path variable is the semicolon (;) .
Details for how to update the Path variable for some Windows distributions can be found here:
http://www.java.com/en/download/help/path.xml
After doing this, start the Muse Proxy Service from the Windows Services management console
or by typing in a command prompt window the following command:
net start “Muse Proxy Server”
Certain kinds of Antivirus software automatically change the extension when downloading a file with exe extension via HTTP (eg. muse-win32.exe is renamed to muse-win32.1.2D0D17.efw). You should just rename the file to muse-win32.exe and run the executable.
More details about the .efw extension are available here: http://www.fileinfo.net/extension/efw
One can specify an IP address for Muse Proxy to listen on for connections. By default, Muse Proxy listens on all IP addresses, on all interfaces.
This setting can be changed in the ${MUSE_HOME}/proxy/MuseProxy.xml file by specifying an IP address in the " field.
For Muse Proxy service to correctly work on Windows 64-bit systems you must install Muse Proxy either using the muse-proxy-setup.jar file or the executable file (muse-proxy-win32.exe). In the latter case you must set JAVA_HOME environment variable to the location of the 64-bit Java.
If no JAVA_HOME is defined and there are both 32-bit JAVA and 64-bit JAVA when installing Muse Proxy using muse-proxy-win32.exe file, then 32-bit JAVA will be used and Muse Proxy Service will not work correctly.
If JAVA_HOME is set to the location of the 64-bit JAVA and there are both 32-bit JAVA and 64-bit JAVA, then the JAVA used will be 64-bit JAVA, thus the services will work correctly.
Follow these steps to install the new Muse Proxy version:
– stop the Muse Proxy
– delete the content of the ${MUSE_HOME}/proxy/cache directory. IMPORTANT: Do not delete the directory itself, only its content.
– copy and dearchive the attached file “proxy.zip” in ${MUSE_HOME} directory
– start the Muse Proxy